Are you keen to fly a remote control quadcopter? Quadcopters are great fun. Whether you are flying indoors or outside, they are really enjoyable models for all ages and experience levels. To help you get up in the air faster, Modelflight has prepared this step-by-step guide to help you learn to fly quadcopters.
Why Quadcopters?
If you dont have much experience with RC models (or no experience whatsoever), quadcopters are a great place to start. Because quadcopters come with four blades instead of two, they are generally more stable in the air, compared with remote control helicopters. Some of the latest RC quadcopters for beginners at Modelflight also feature advanced technology like sensor-assisted flight envelope (SAFE) and artificial stabilisation 3-axis (AS3X) systems. Both these systems are designed to make flying easier. If you would like more information about either of these technologies, check out blog posts on SAFE Technology and AS3X.
Remote Control Quadcopters for Beginners
If you are looking for a great RC quadcopter for beginners, Modelflight have written a guide for finding the best remote control quadcopters for beginners. In summary, some of the beginner RC quadcopters we recommend include:
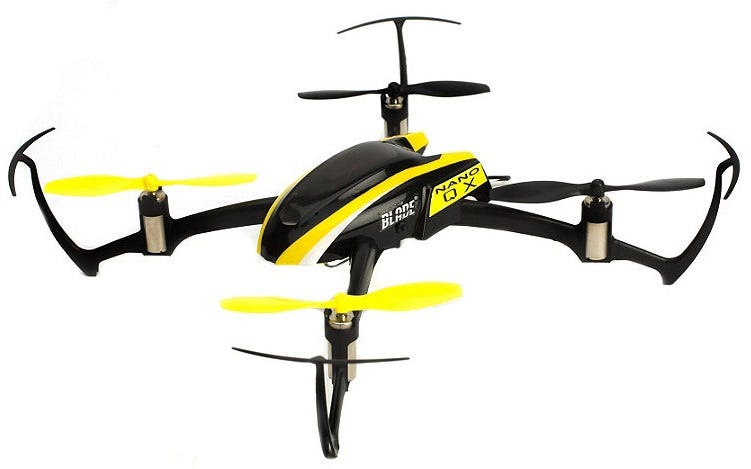
Feel free to check out these quadcopters on our website. For the purposes of this guide, though, we will be focusing on the Nano QX, which, in our opinion, is the best RC quadcopter for beginners. The following sections are derived from the Blade Nano QX Manual, which is available for download on our website.
Charge the Flight Battery
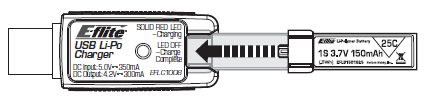
One of the first things you should do with any RC quadcopter is charge up the models battery. The beginner quadcopters we have recommended all come ready-to-fly (often abbreviated as RTF), so you will receive a flight battery and charger with your purchase. In the case of the Nano QX, the flight battery comes with a USB charger.
Once you connect the charger to your computer, you will see the LED charge light turn red. When the light goes out, the battery has been charged (this usually takes 30-40 minutes). TIP: Make sure you fully charge the battery before your first flight to maximise the Nanos performance.
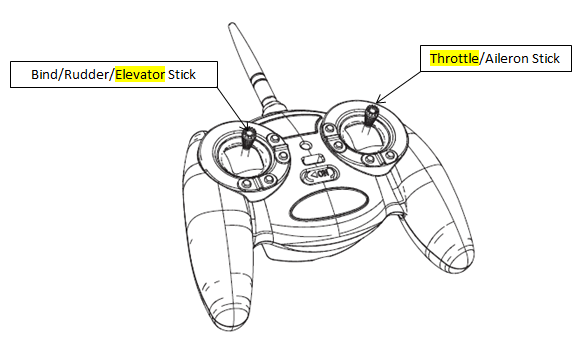
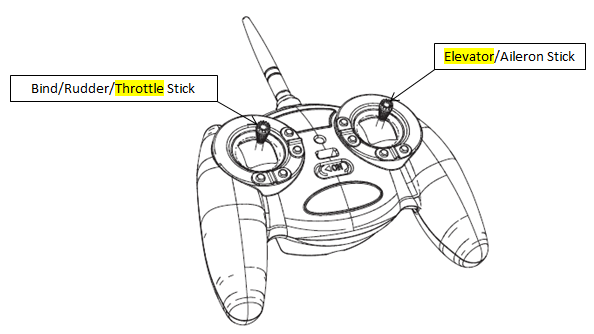
Mode 1 or Mode 2?
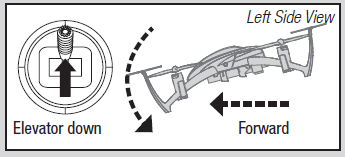
Before you start flying, make sure you know what the key controls are. How you use the transmitter with a Mode 1 Nano QX is different from how you would use the transmitter for a Mode 2 version. These differences are highlighted in the diagram below. Note how the throttle and elevator controls swap from Mode 1 to Mode 2 transmitters. The throttle increases or decreases the speed of the motors and the elevator moves the Nano QX forwards or backwards.
Mode 1 Transmitter
Mode 2 Transmitter
If you would like more information about the differences between Mode 1 and Mode 2 transmitters, check out this video below:
Installing the Flight Battery and Binding the Transmitter
To install the flight battery in the Nano, the first thing to do is ensure that the throttle stick on your transmitter is lowered.
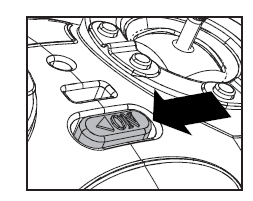
Once the throttle stick is down, you can install the battery. In the Nano QX, this can be done by sliding the battery into the mount located underneath the quadcopter (as seen in Image 1 below) and joining the connectors as shown in Image 2.
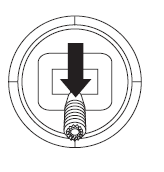
Place the quadcopter on the ground at let it stand still (this helps configure the SAFE Technology). After approximately 5 seconds, you will notice a flashing blue light on top of the quadcopter. This means that you are ready to bind your transmitter to the Nano QX. Binding your transmitter is the process where you connect the radio to the quadcopter wirelessly. In order to do this, push in and hold down the left stick on the transmitter and switch the transmitter on, as shown in the image below. You will hear a click when this occurs.
After 2-3 seconds, you can let go of the left stick. You should see the quadcopters light stop flashing and turn solid blue. This means that the radio has been connected.
If you would like more information, we have a blog post on how to bind an air radio to an RC plane (a similar procedure to binding an remote control quadcopter). You can also check out the video below:
Flying the Quadcopter
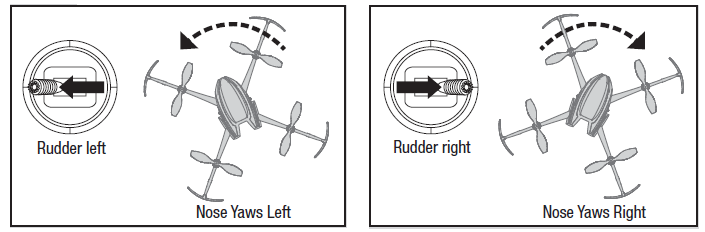
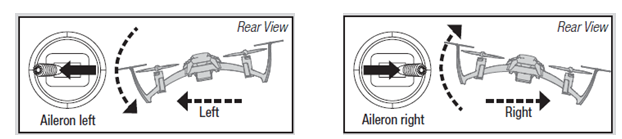
As soon as the binding is done, you are ready for take-off! To get the Nano QX into the air, gently push the throttle up to start the motors and the quadcopter will climb steadily. You will find that the Nanos SAFE Technology ensures that it will hover steadily in the air, allowing you to get a handle on the controls. To move the Nano QX forward, gently move the elevator down, as shown in the image below: The Nano QX is very responsive to controls, hence the reason why we suggest that move the radio sticks slowly until you get the hang of it. If you want to go backwards, simply move the elevator upwards, as shown below: You can also change the direction of the quadcopter by simply shifting the rudder left or right: If you want to shift the Nano QX up or down on an angle, move the aileron to the left or right respectively: When you are ready to land, simply move the throttle down to descend: Remember, if you do encounter any difficulties while flying, SAFE Technology can help. If you switch off the transmitter mid-flight, the Blade Nano QX will automatically land on the ground. You can see this being demonstrated in our video on SAFE Technology in the Nano QX: TIP: Disconnect the battery from the Nano QX when you have finished flying to conserve the power for your next flight. Thats the basics for flying the Nano QX quadcopter. If you are feeling more confident, you can change the Nanos flight mode from Stability (the default flight mode) to Agility, by simply holding down the left flight stick. You should see the blue light on the quadcopter turn red; indicating that it is now in agility mode. Agility mode removes the sensor-assisted flight envelope, freeing up the Nano to perform aerobatic manoeuvres such as loops and rolls. Matts Top Tips for Flying RC Quadcopters As a bonus, Modelflights resident RC pilot, Matt, put together his top three tips for flying remote control quadcopters: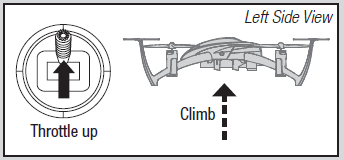
- Stand behind the quadcopter and make sure that it is facing away from you. This helps you with the orientation as you learn to move the model forwards and backwards.
- Keep the quadcopter relatively low to the ground so you can keep your eyes on it and land it easily.
- Try to fly in an open area to minimise the chance of damage. While some of Modelflights quadcopters are small enough to be flown inside your own home, we would still suggest finding a room where there is plenty of space.